Embroidered Athena Top

IMG_1208.jpg

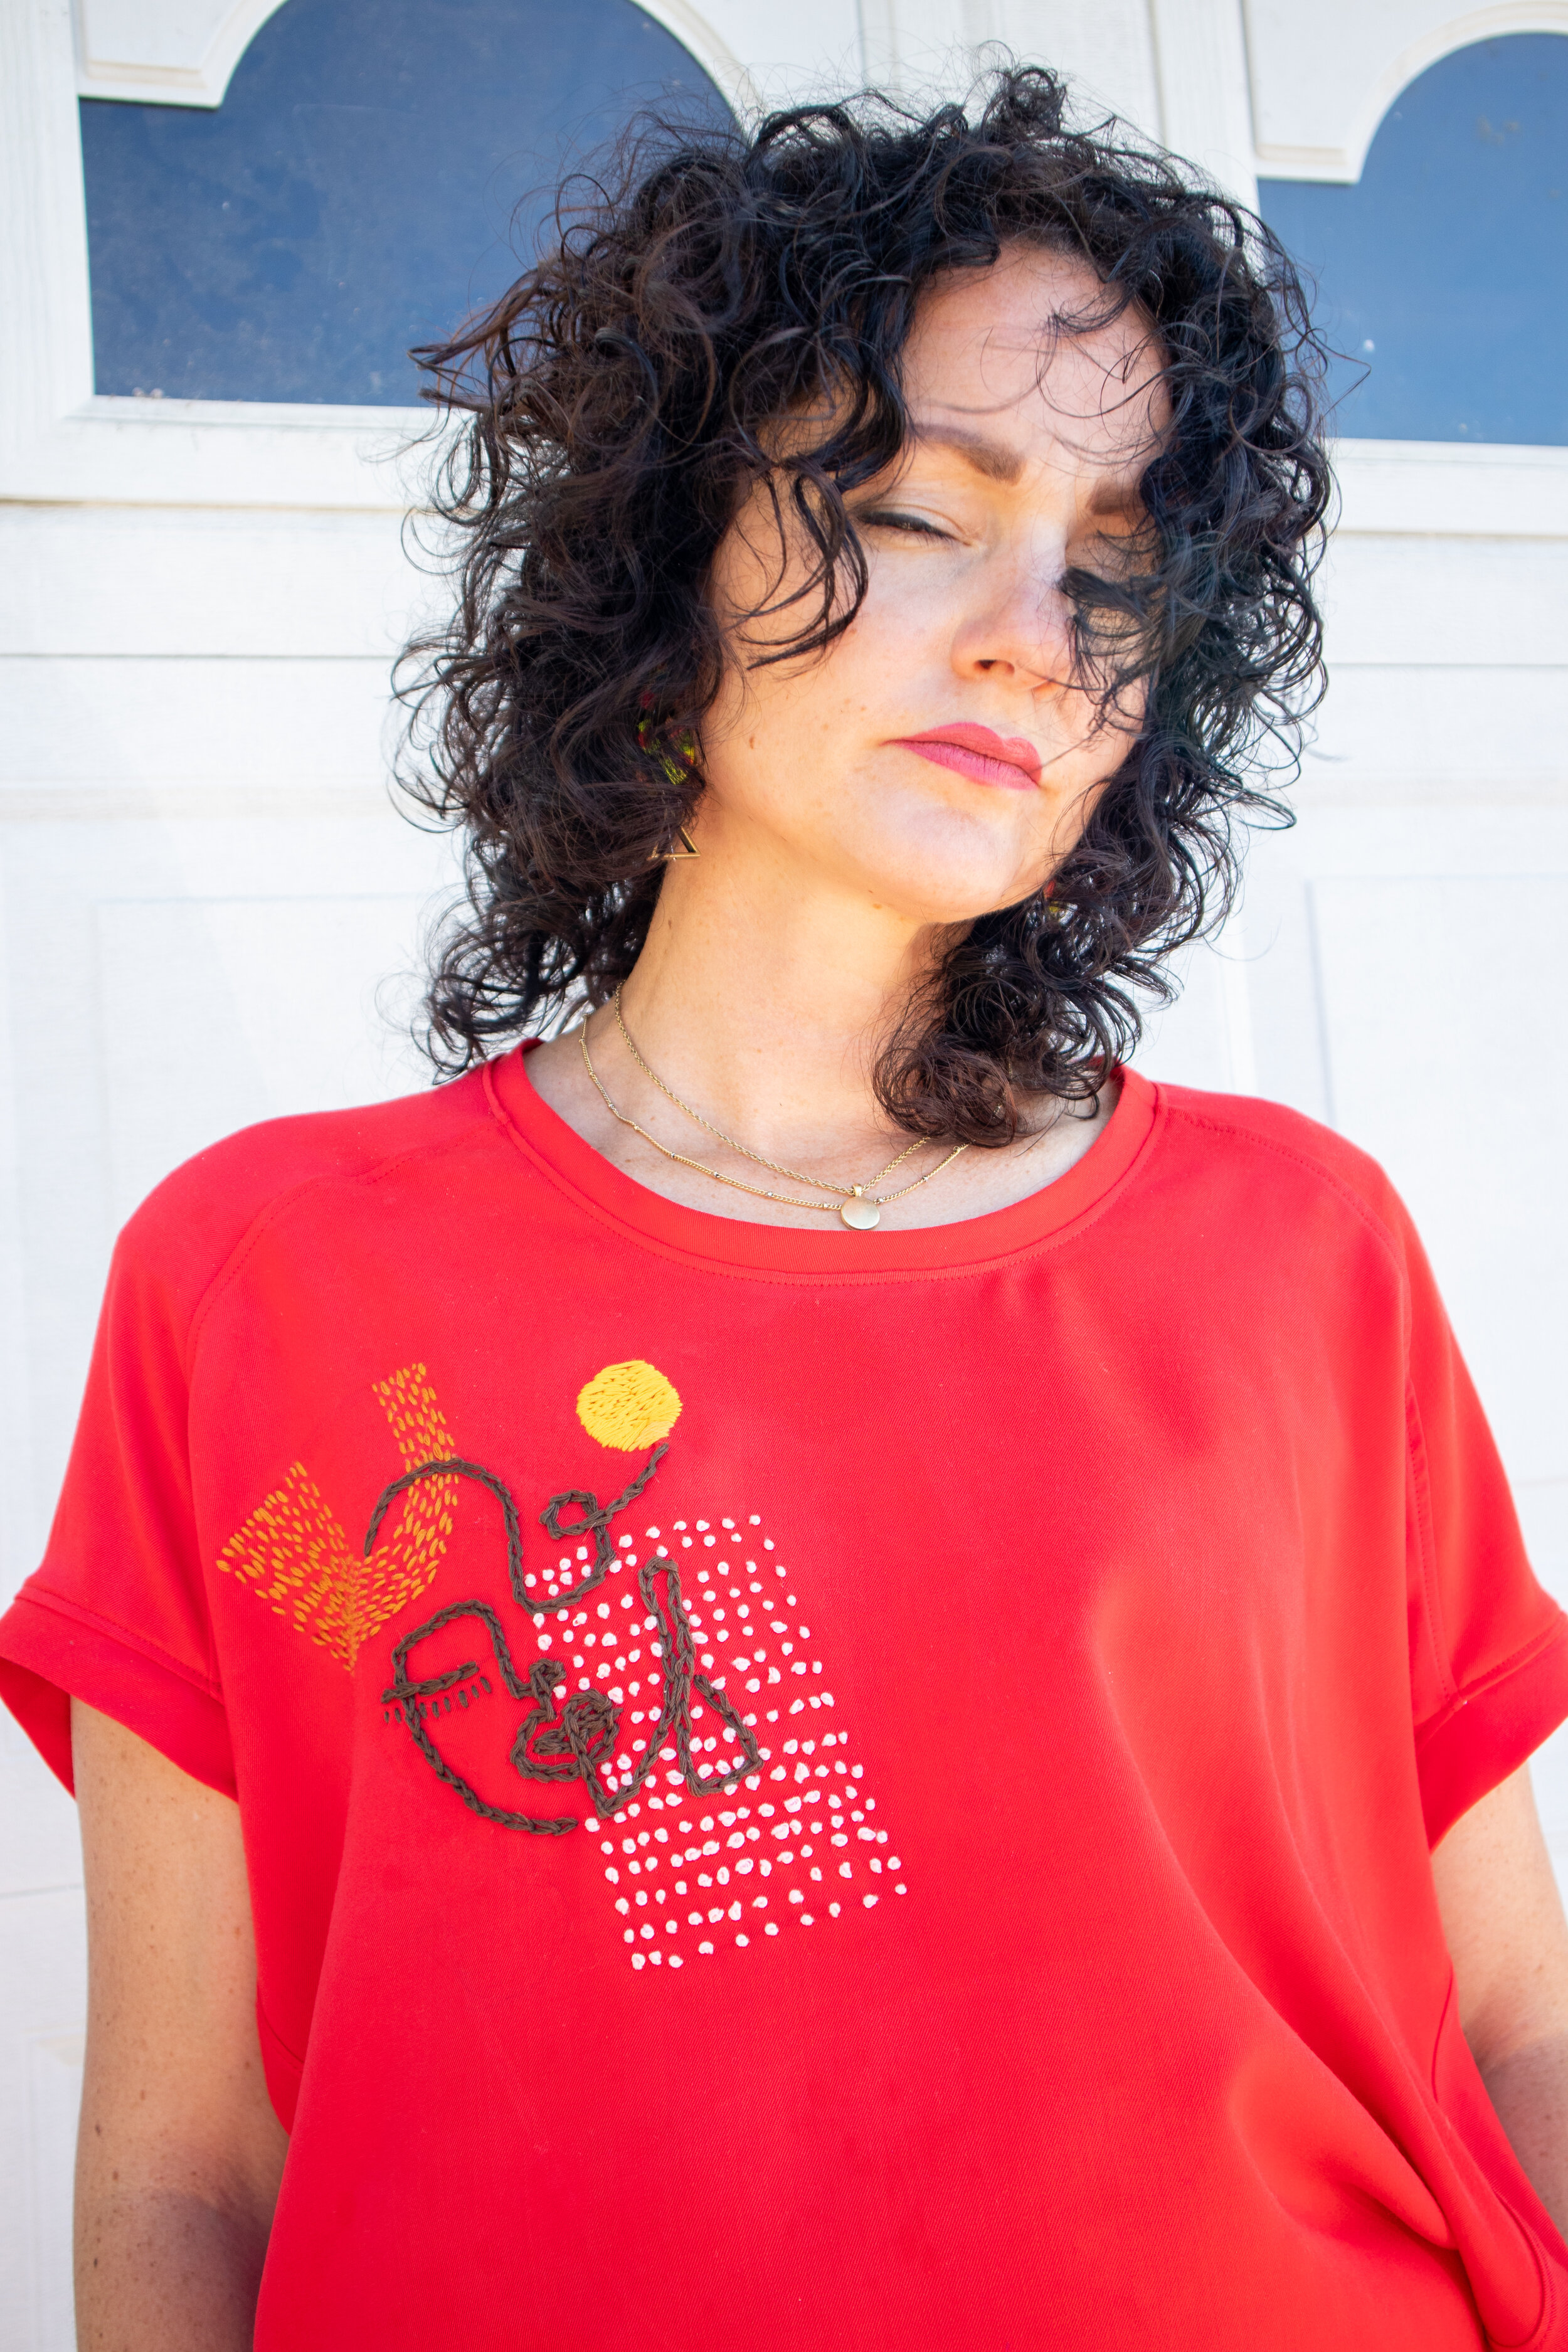
Say hello to my fourth embroidery project! Isn’t she a fun one?! I have Covid-19 to thank for getting me into this craft. Each project took a little longer than the one before, with this one taking approximately three months to complete. I have decided though, she was completely worth the wait!

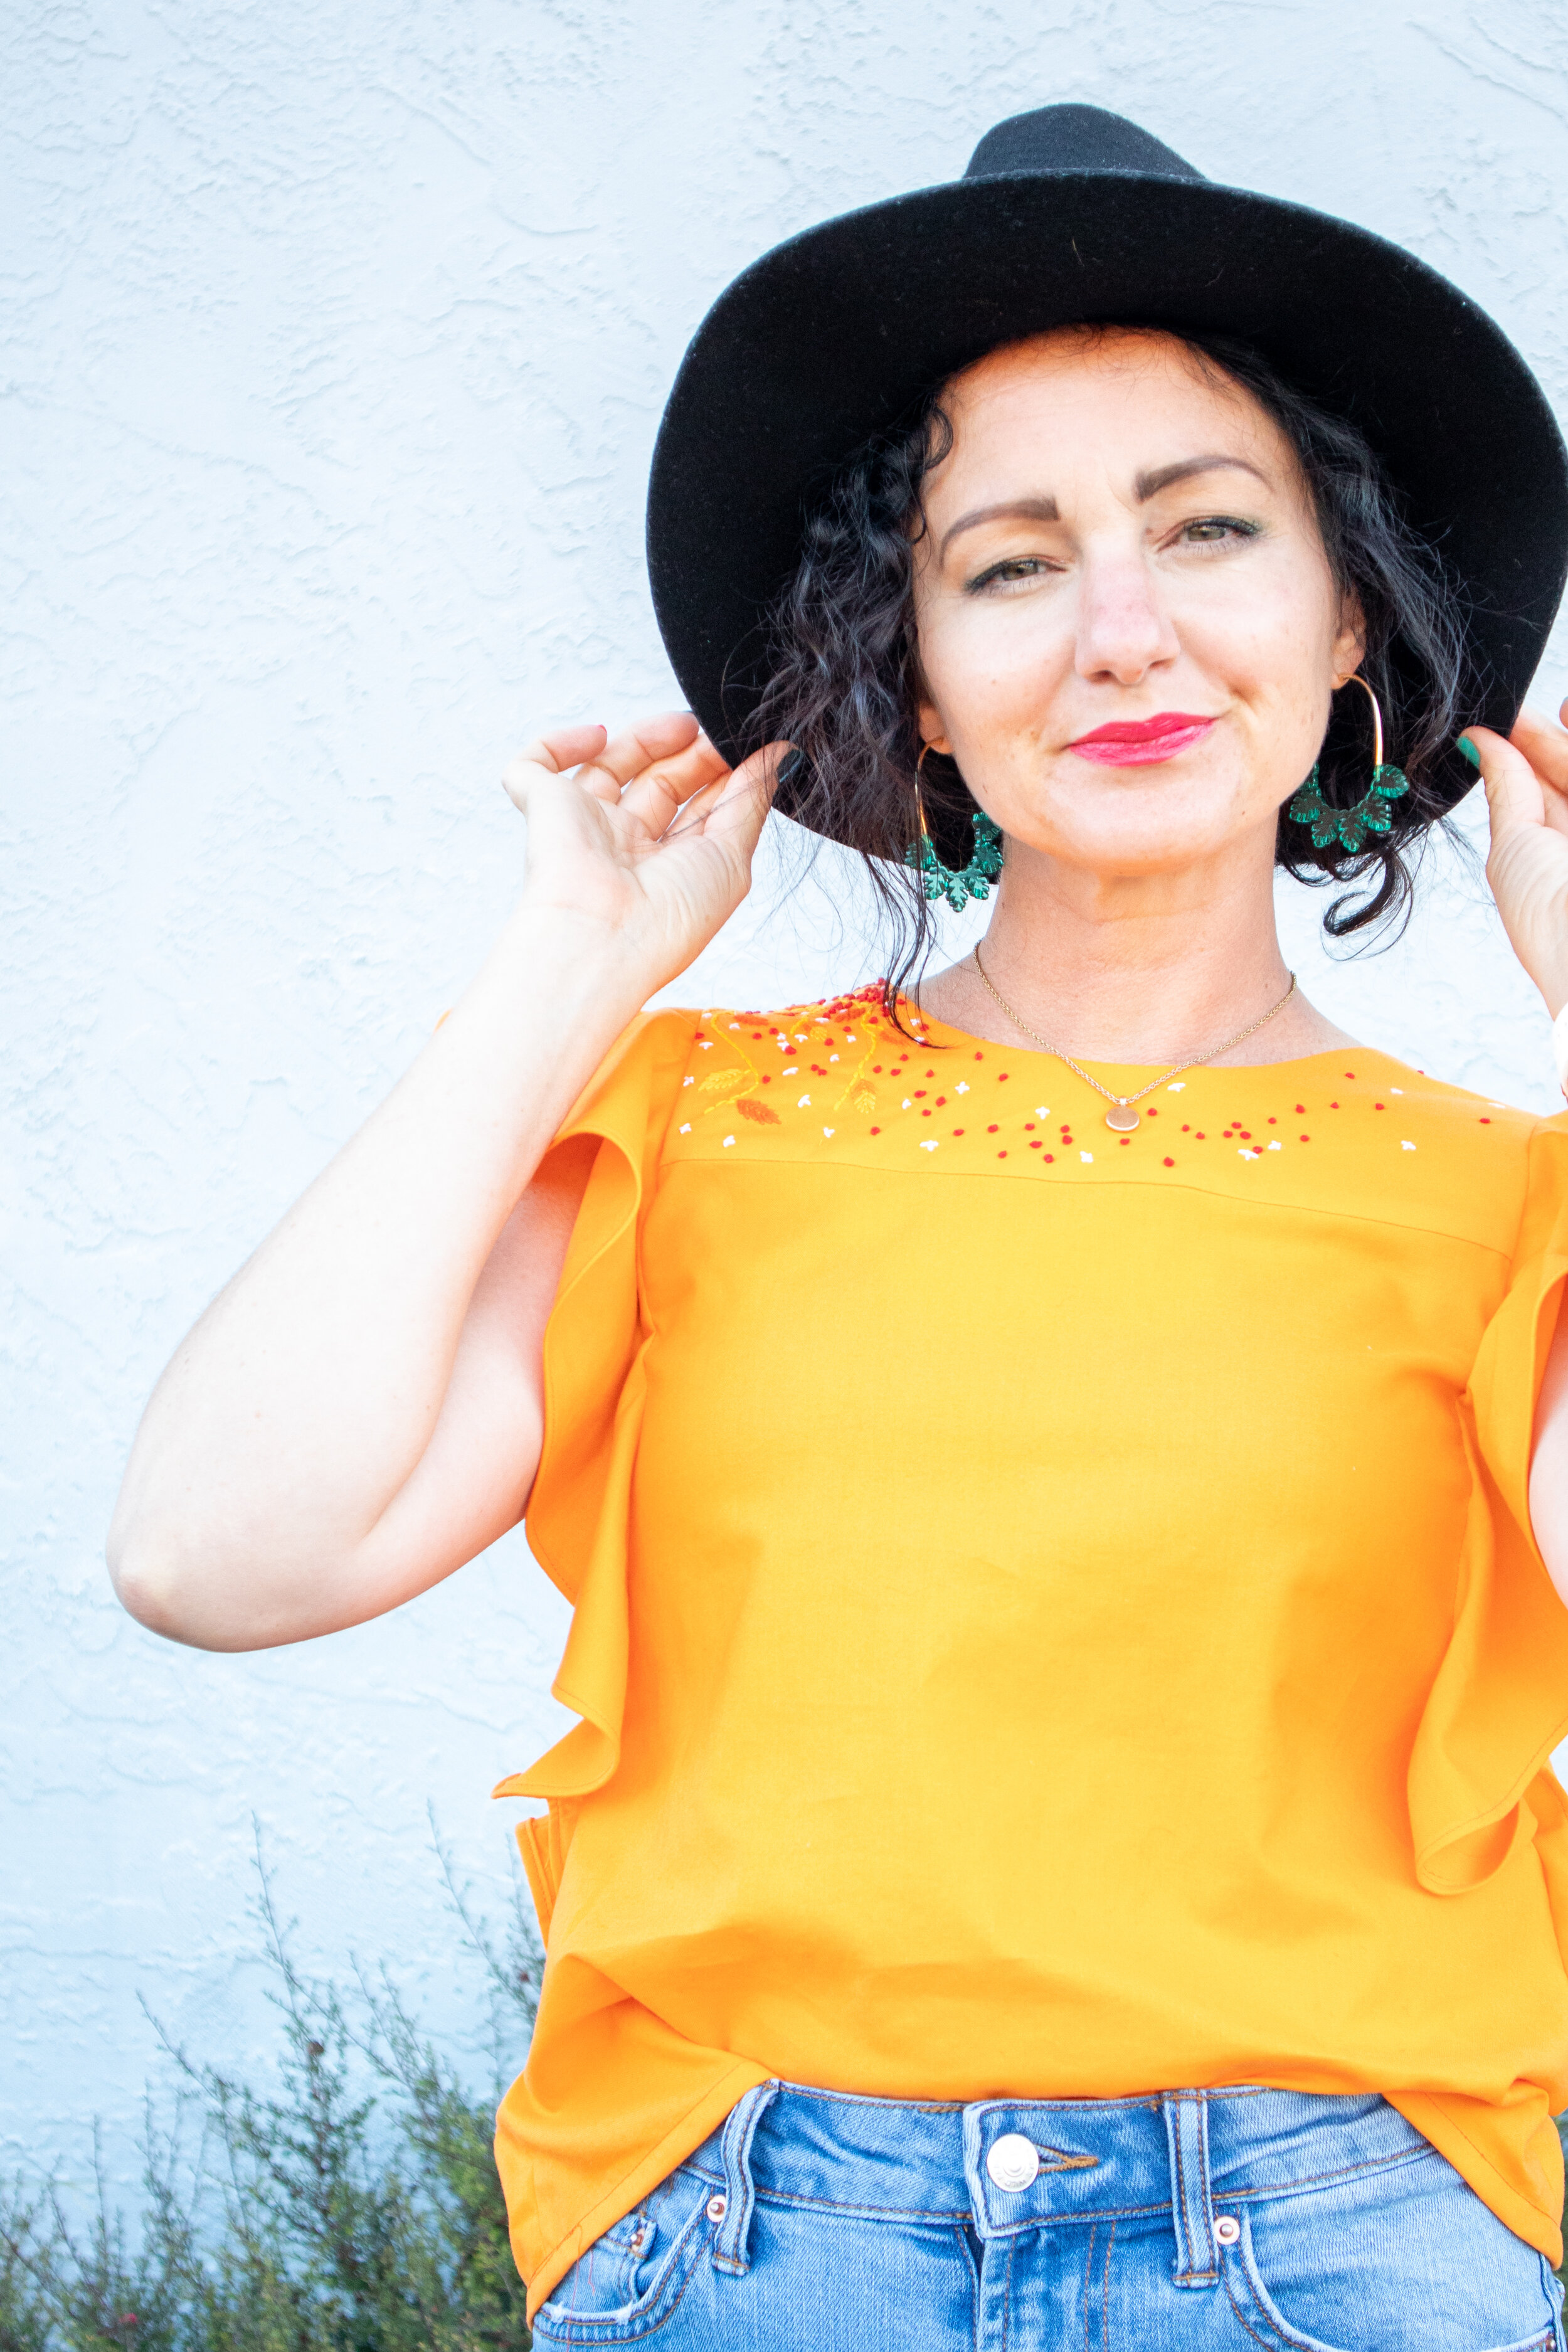
I worked on this embroidery while recovering in my bed post shoulder surgery, during movie nights with my family, sitting at the pool and watching my kids swim, and while talking with others. I found elements of pictures I liked and put them together to create this design. I didn’t exactly know what I was doing, but I did some research and just went for it anyway. I put the face on there to represent the strength I see in the amazing women around me, and I felt it myself as I finally finished and put on this top. It helps remind me that I am so much more capable than I often give myself credit for.

IMG_1184-2.jpg

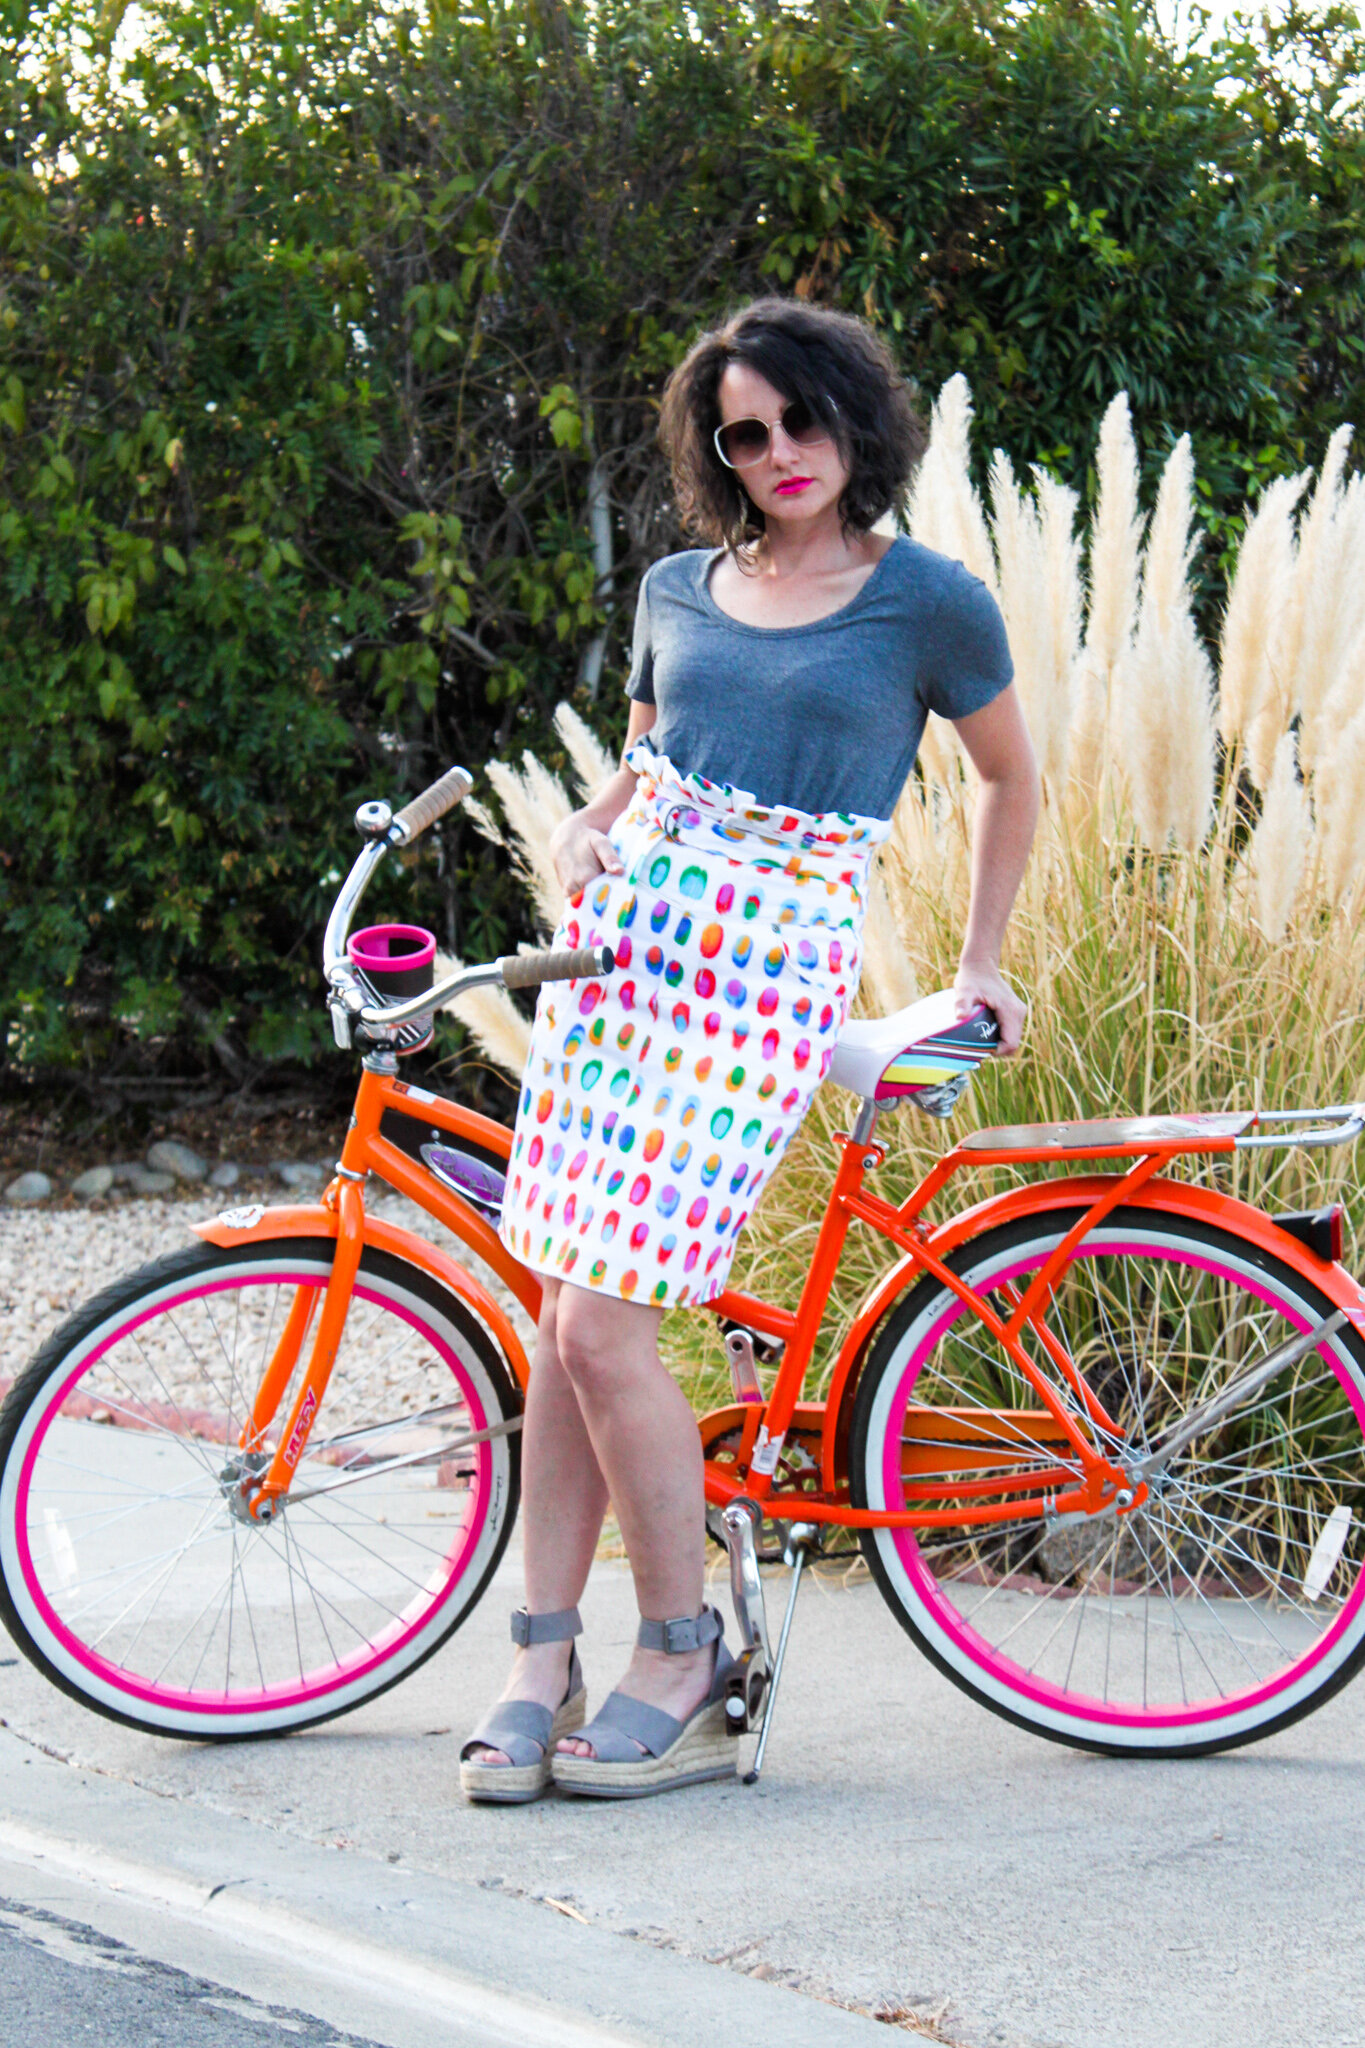
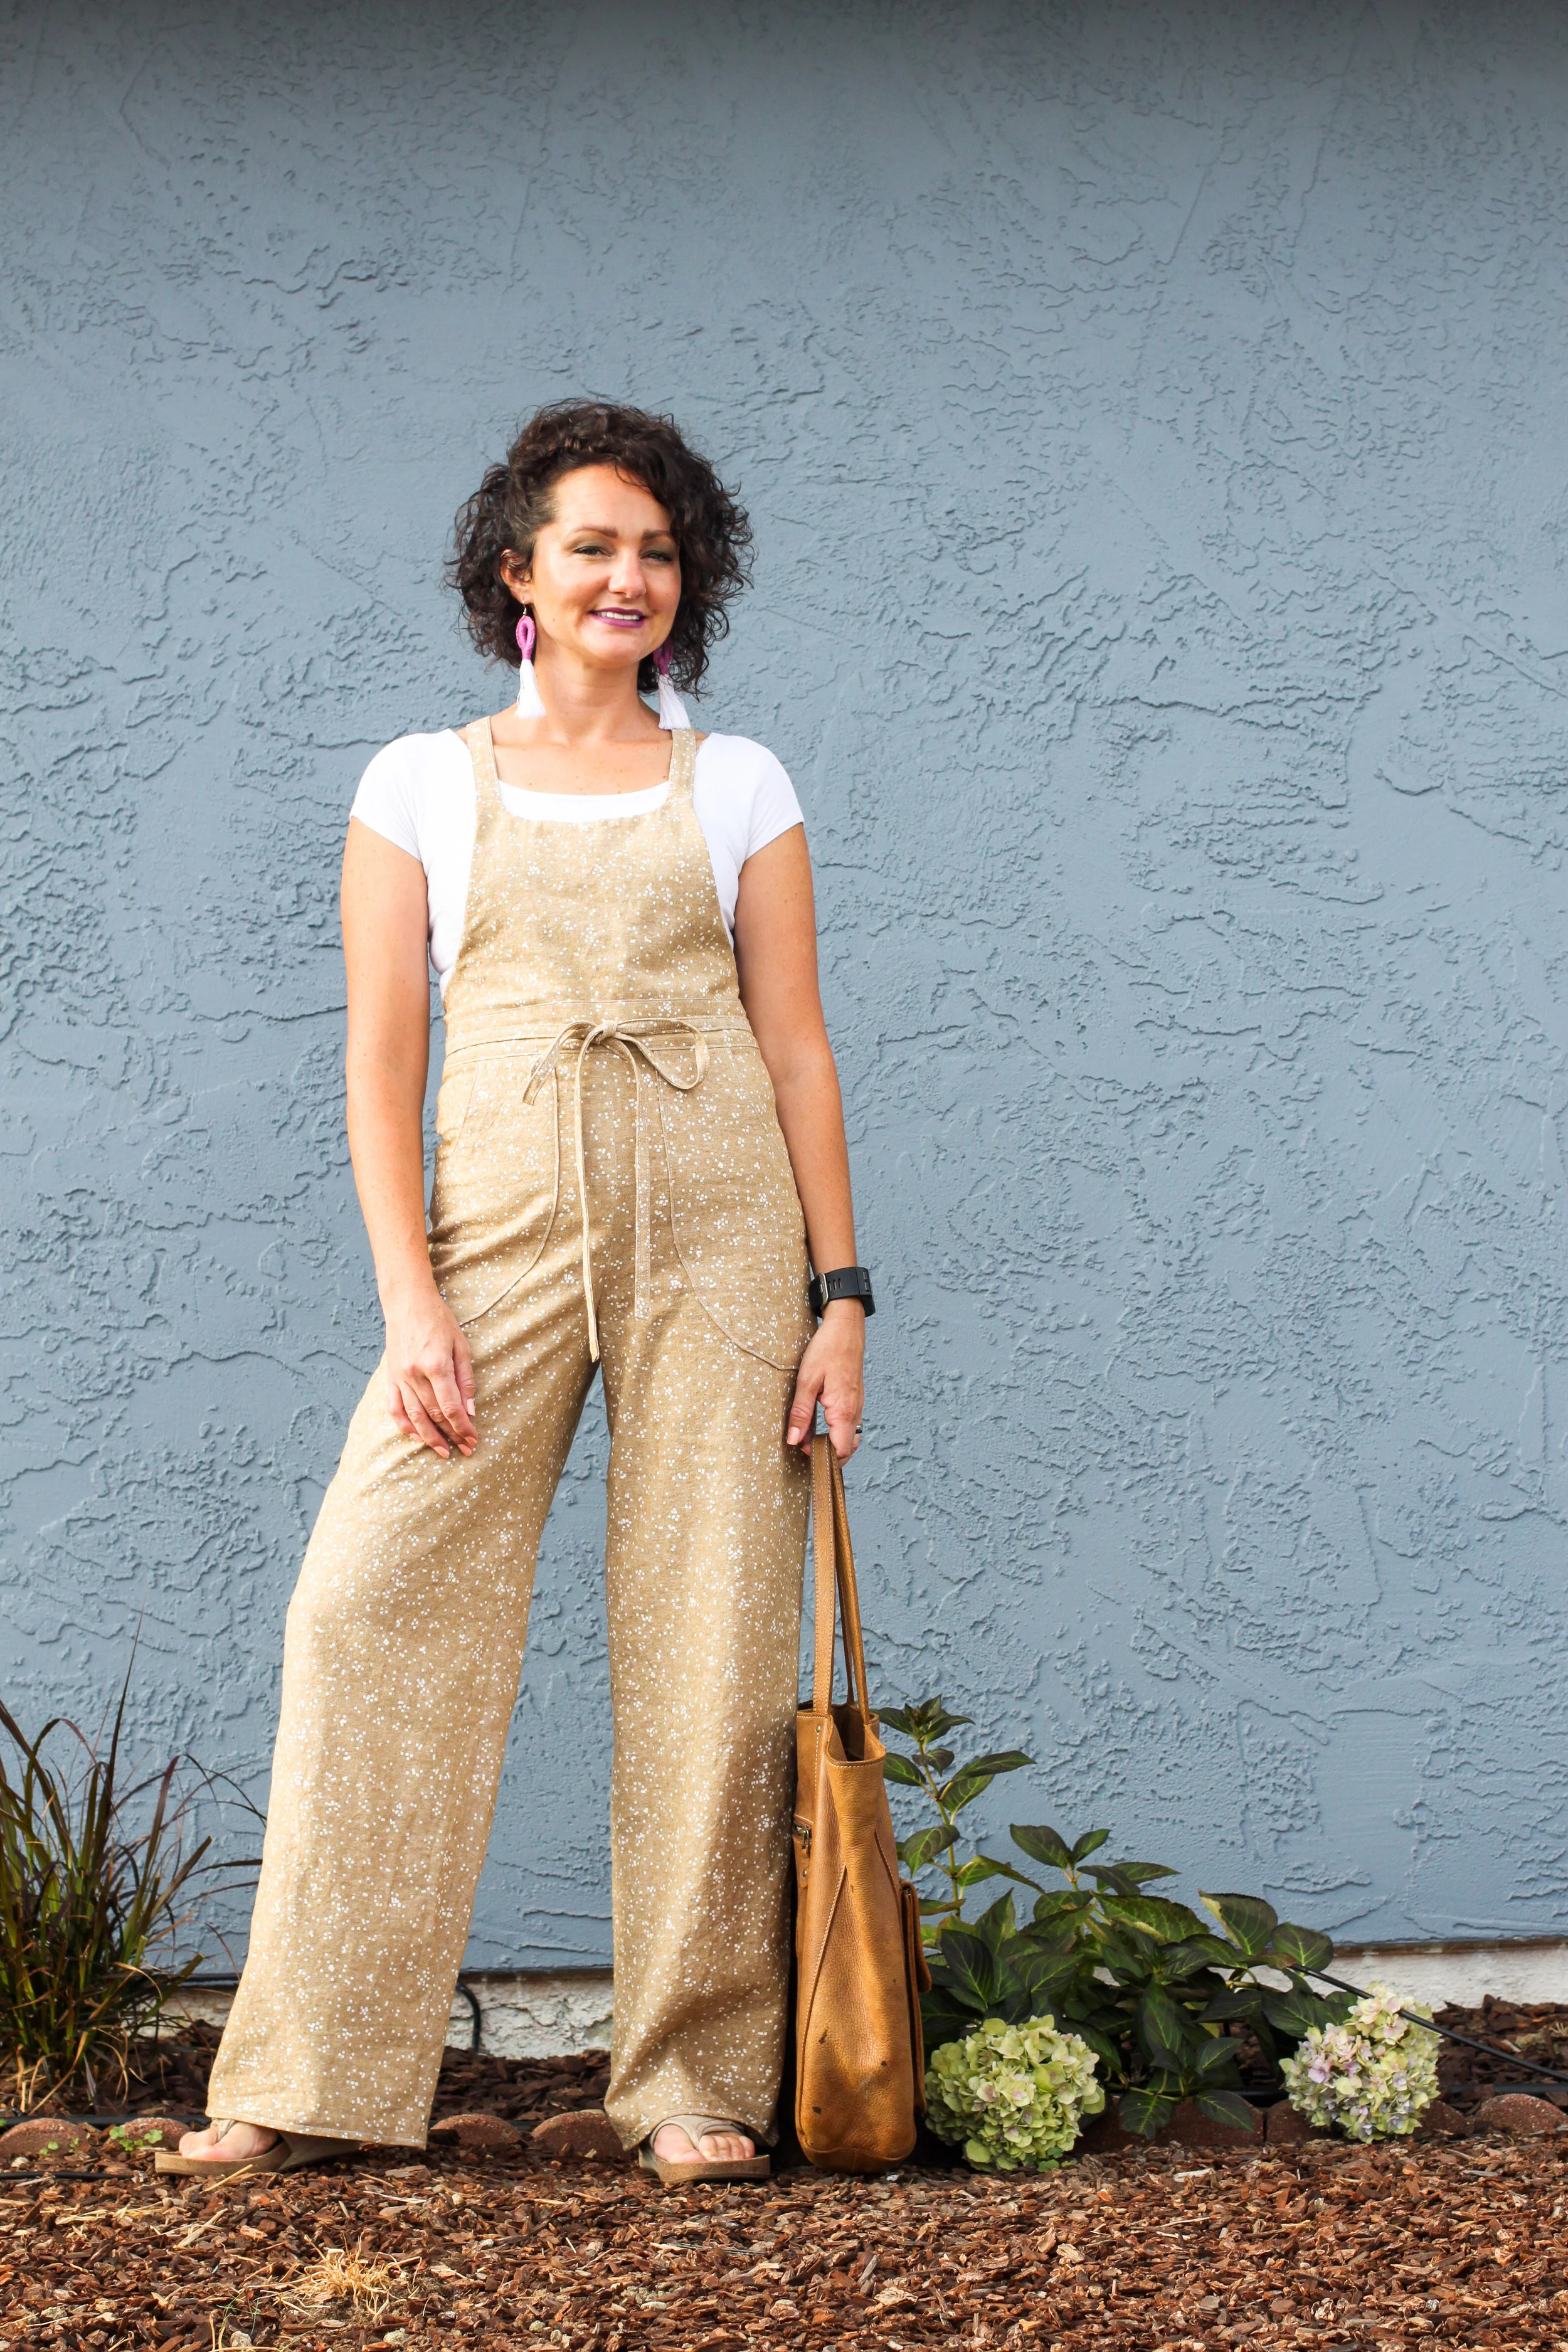
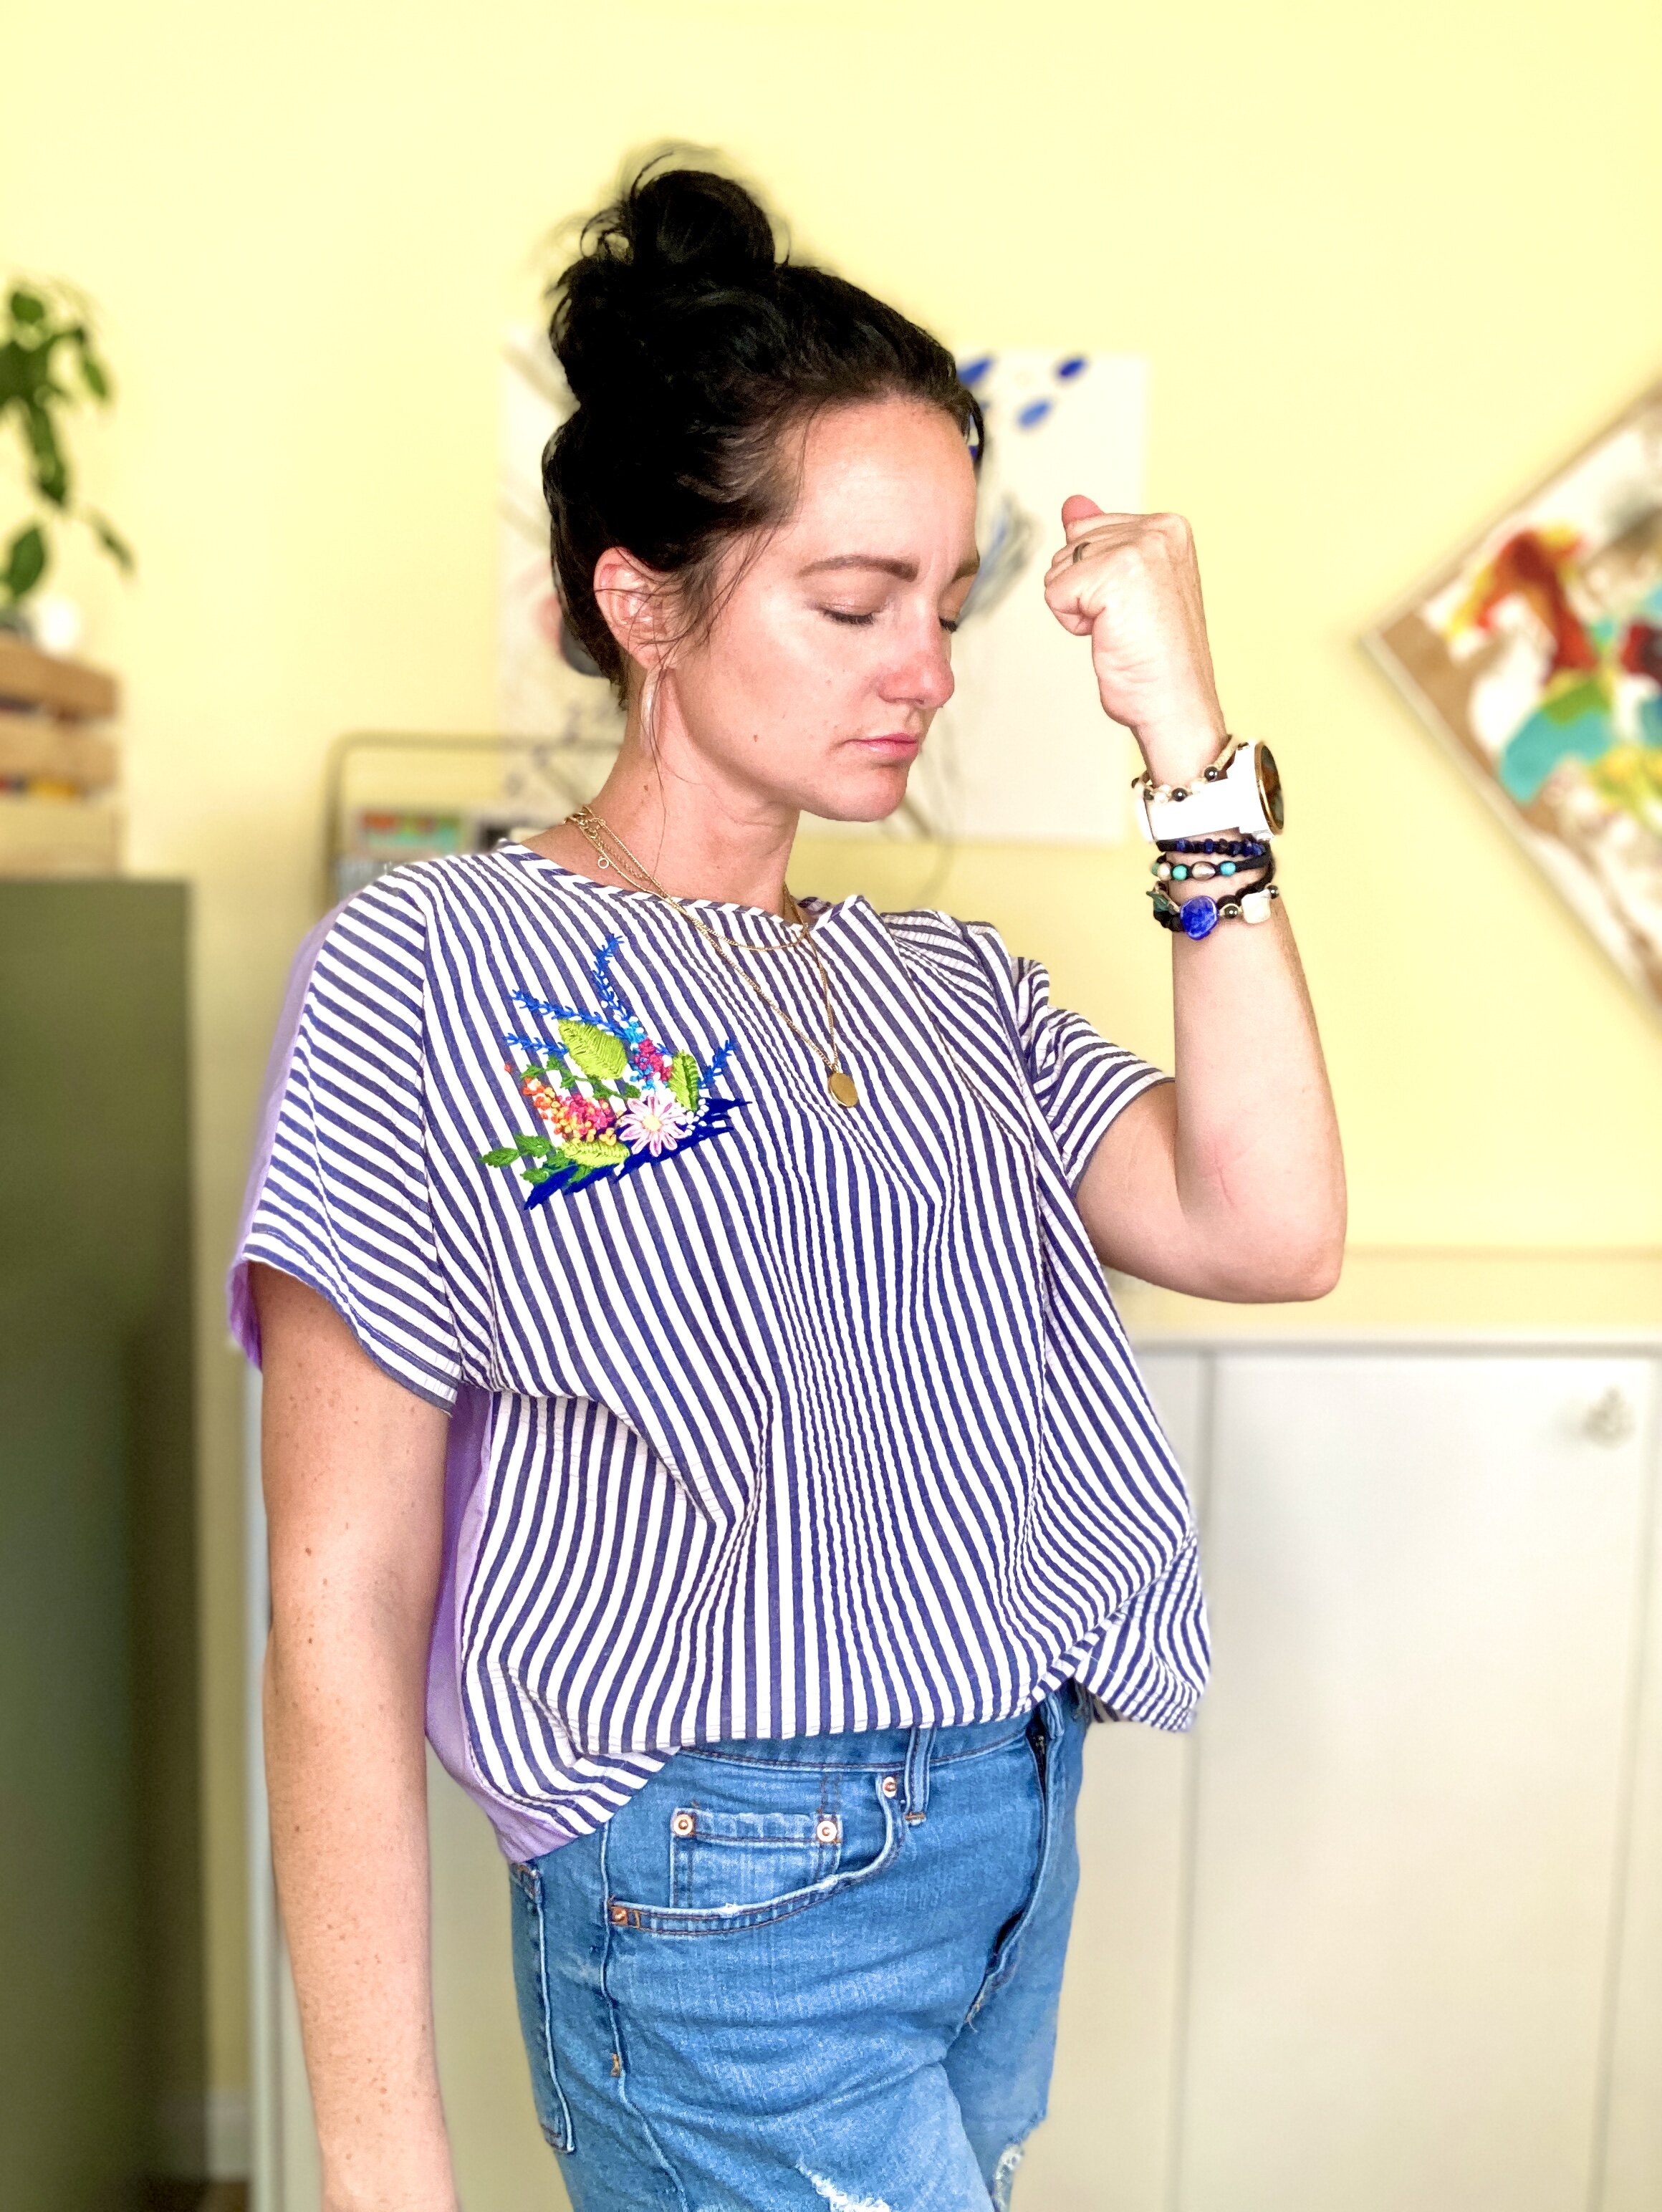
I love this top so much! It is the Athena Top by Helen from Gray All Day, in a thrifted fabric gifted to me from a friend. When I started sewing, I would sew anything really according to a new skill I wanted to learn. I made a lot of clothes that weren’t my style in fabrics I didn’t love. I have since learned to be more picky, and also continuously work to to refine (and accept) my style. I am truly a t-shirt and jeans kind of girl… but please make them interesting! Ha! That is why I love this top so much.

IMG_1130.jpg

It has beautiful drape, a loose fit that stays far away from my armpits (a must for hot/humid weather), a high low hem line and interesting sleeves. Plus add the embroidery and this top has a lot of personality!

IMG_1114.jpg

I decided it is feminine enough that I could style it with a pair of my husband’s hand-me-down jeans (no, you are reading that right… I can wear my husband’s jeans! We have similar waist sizes! I’ve decided I love him anyway. Ha! But really, so much…). They are a little big, especially in the back and around to the front, but I just decided that was the look I was going for. Ha! They are true boyfriend jeans!

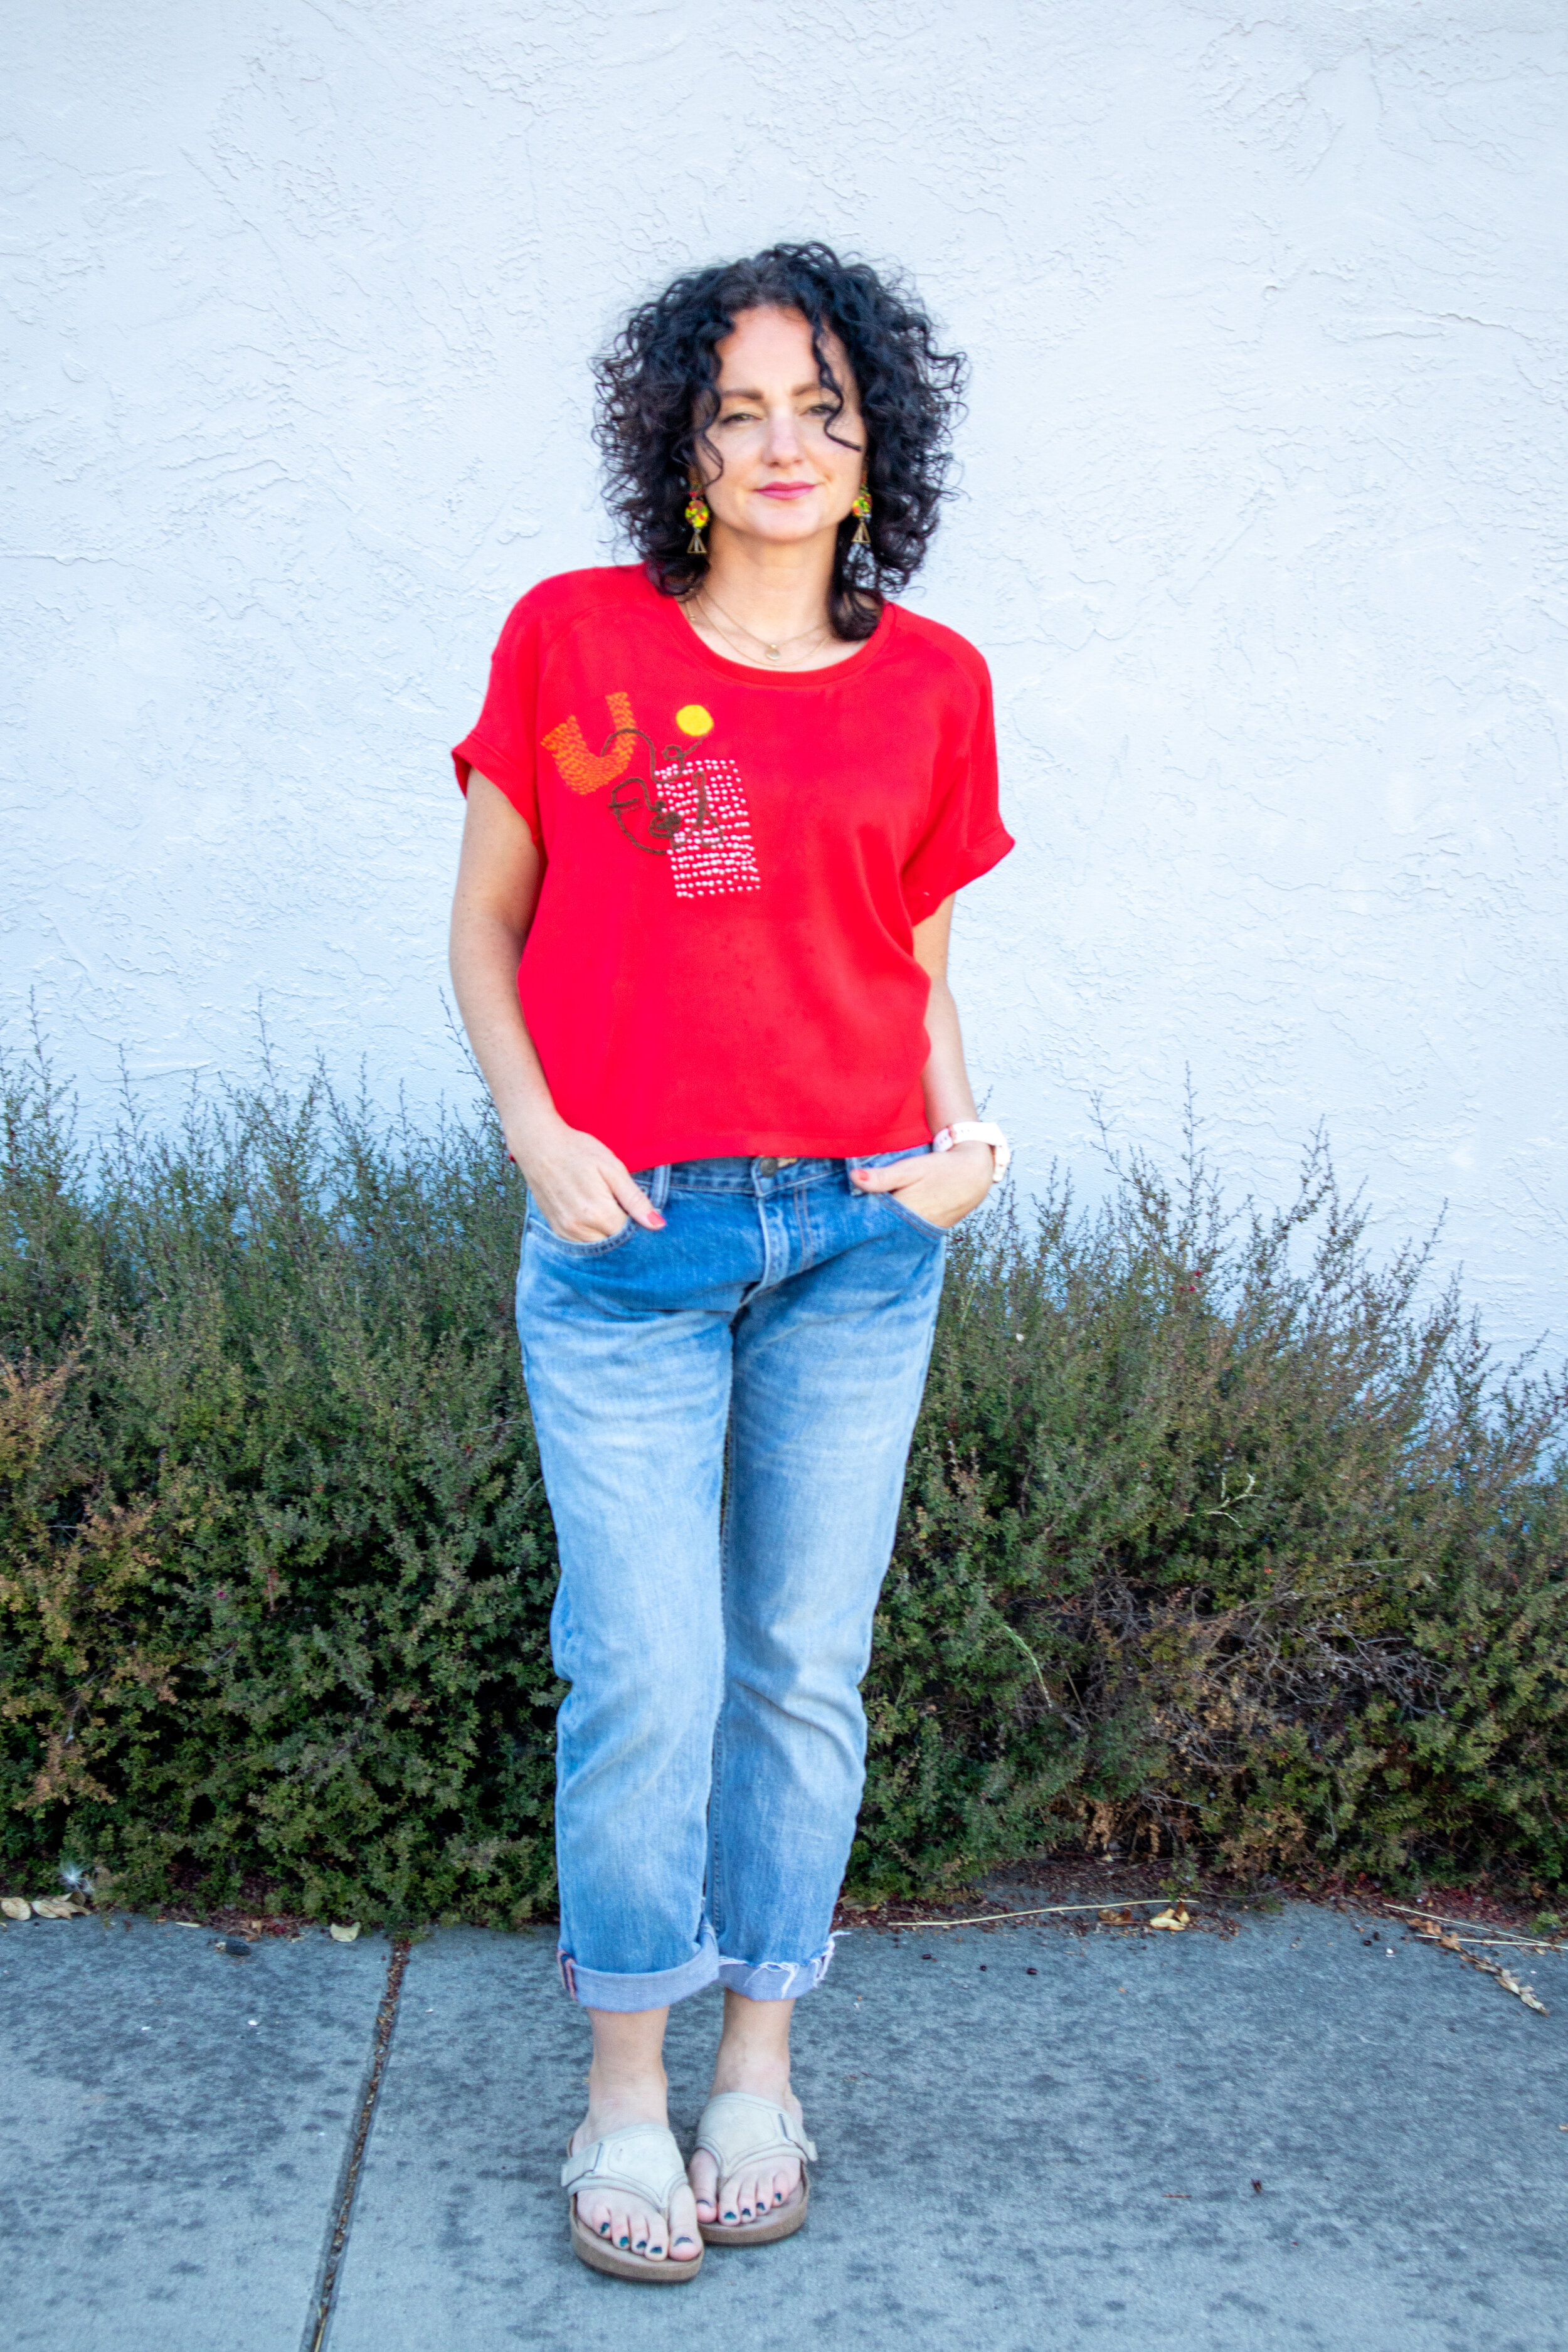
The older I get, and with the ability to make my own clothes, I have decided I cannot sacrifice a “little pain for a little beauty,” as the saying goes. Ha! I am realizing my wardrobe has to be conducive to my life style, which with four little kids is a very active one. I want clothes I can move in, that make me feel put together and stylish, that are comfortable and can be worn at the baseball fields (post Corona), to the grocery store, and to going out to grab a bite to eat with my favorite man all in the same day. I want clothes that make me look like I am trying harder than I am. Ha!

IMG_1100.jpg

This top will be worn repeatedly, happily, and proudly. It will remind me I can be stylish and wear things that feel “me”! It will remind me of the strength I see in the women around me and within myself. If you are learning to sew, or looking to pick up a few sewing tips yourself, I’ve started a YouTube channel to help with that! Check it out here.

IMG_1205.jpg

Remember, its okay to make make mistakes. That is how we learn! And we are worth feeling good in what we wear. Happy sewing friends!

Dionne Duster: Non-Stretch Tips

Hi all! It’s been a hot minute hasn’t it!? Ha! While I know it has taken me far to long to brush off the ol’ blog, I am so happy to be here today and share with you my newest make!

Welcome to my closet Dionne Duster! This pattern comes from the dynamic duo Katie and Mac at Sew Altered Style. I used this Lurex Wool Blend Coating fabric from Minerva, and if you look close it has acrylic bands of gold woven in and such great texture. It is a complete stylistic dream!

IMG_0982.jpg

I was first drawn to this pattern because of its amazing lines and sleeve detail. Aren’t those cute little gathers around the cuffs so fun?! Also, I love the length and knew it would become a staple in my closet.

IMG_1020.jpg

However, per usual, I didn’t completely follow the rules. I made my duster out of fabric NOT on the recommended list. There is no stretch to this fabric, which caused me to make a few small changes.

IMG_1042.jpg

With a non stretch, it was important for me to look at the finished garment measurements and determine how much ease my desired size would have once it was all made up. If it wouldn’t be enough to get my arms into the duster, then I knew I needed to size up. This is however, I should note, a forgiving pattern to make in a non-stretch as it remains open in the front.

Armhole size is another thing to be aware of. I made the armholes slightly bigger as I knew there would be no stretch and I wanted them to comfortably fit near the shoulders. My shoulders are wide, but this duster fit them beautifully!

IMG_1018.jpg

Cuff bands and neckband were the last places that needed adjust when making this pattern out of a non stretch. I added at least an inch to the cuff (sorry, don’t remember the exact measurement). I sewed the cuff into a round, folded it over, and then double checked to make sure it would fit over my hand. Only then did I sew it onto the sleeve.

IMG_1048.jpg

For the neckband, I also added about an inch to either end. If I had too much I simply cut it off. I then did my best to stretch (which didn’t really happen at all) best I could around the curve of the neck only when sewing it in to maybe make it lay a bit flatter. Honestly, it does kind of stick up but not in a weird way and I love the way it hugs the back of my neck, like a popped collar.

IMG_1008-2.jpg

Really that is it for non-stretch tips! I love the pocket size on this duster and chose to line it as I knew my cell phone would be living there often.

I also made the addition of adding a tie for the waist. When I’m cold, which is often, I love being able to keep my jackets, coats, dusters or cardigans shut so this felt like an obvious good choice to me.

IMG_1051.jpg

That’s it! If you have questions feel free to ask! I might not have the answers but I will sure try to help! Happy sewing friends!

Oh, and in parting, I just have to share my newest polymer clay earrings. I am new to this craft, but just loving every part of the process of learning. I have always loved earrings, and learning to making my own is so fun for me! This is the front and back of the same pair - so if I am wearing them with my hair up they look cute and spunky from every angle. Ha!

High Street Skirt Pattern + Spoonflower Fabric Review

IMG_6268.jpg

Growing up in the 80’s and 90’s, this skirt feels like an ode to my youth. I love the comeback of the high waisted jean trend, and the High Street Skirt by Cali Faye Collection feels like it is in that same vein.

IMG_6251.jpg
IMG_6319.jpg

My favorite features of this skirt are the yoke, hardware and belt. I also love the look of the topstitching, although I must admit it isn’t very fun to do. Ha! I love the details of this skirt, and how they come together to make a truly fun piece to wear.

IMG_6237.jpg

I remember growing up having a lot of “paint splattered” clothing. It was the trend of the 80’s, meaning of course I didn’t wear it much until the 90’s. Ha! I was never very on trend, but I do have a lot of nostalgic feels surrounding this style. Using Katie Kortman’s Multi Colored Dot Rainbow, in bull denim from Spoonflower seemed like the obvious choice for this particular skirt. It is reminiscent of paint splatters and the colors are amazing! I chose to have this print printed on 100% cotton, 11.7oz dogwood denim. I was beyond impressed with the quality this denim, and the vibrancy of the pattern (even after a wash!)

IMG_6269.jpg
IMG_6341.jpg

The only part of the skirt pattern that I will play around a bit with next time is the back yoke. It tends to bunch up when worn, and I will look into the proper adjustment that I need to make for my body.

IMG_6326.jpg
IMG_6192.jpg

I really love the style and look of this skirt, and cannot want to make all the versions! I have some navy corduroy that I am so excited to use next!

The material and construction of this skirt allows for it to be lived in, and experience a lot of wear and tear. And yes, I did ride this amazing bike in my amazing skirt! Not sure how often the bike and skirt will meet, but so happy to have this garment in my closet.

IMG_6275.jpg
IMG_6272.jpg

Classic Oxford Button-Up: An Honest Review

**As I asked so many of you for your opinions on a boys button-up, and promised a review myself of what I tired, I thought I would post that honest review here incase others were also on the hunt for a similar pattern.**

OMSC7.jpg

My three boys can be a bit of a wild bunch. They are often found running around outside in the Southern Califorina sun shirtless, shooting nerf guns with all the neighborhood boys, and gathering anyone who wants to our front lawn to play. While I just love their young free spirits and curious/imaginative minds, I can’t help but also love seeing them cleaned up and ready to slay the day!

OMSC2.jpg

I had been searching for some time for a button-up boy’s dress shirt, asking sewing friends online and reading pattern reviews. Seeing this amazing 100% Scarab Cotton Fabric on the Minerva website immediately expedited my search for the perfect boy’s button-up as I knew my boys would love “bug shirts” made from this beautiful fabric so much (and I was right!!). After a few weeks of research, I finally purchased the Classic Oxford Button-Up by Peek-a-boo Patterns to give it a try. The reviews were great, and I’d only heard good things and seen great versions of the pattern made up. I am so glad I went with this pattern!

OMSC9.jpg

The pattern and directions are simple to follow. The shirt is sewn up to be a solid make, yet with no French seams or fancy finishes for the inside side seams/armscye (which for a boys shirt, I am 100% okay with and even prefer). The yoke is done as in any button-up, and all inside seams are finished. The shirt is classic (if not slightly slender) in fit, yet fit all my boys true to size. The only change I made in sizing was to make my oldest boy’s shirt a bit longer, as he is my most slender and I knew with some added length, I could get more wear out of his shirt as he grows.

OMSC11.jpg

The pattern has options for short sleeves or long sleeves, with or without button tabs. It comes in sizes 3 months to 12 years. For a mother with multiple boys, and ever growing boys, I was so happy to see the large size range. I am already making future plans, and cannot wait to make them long sleeve linen shirts with tabs in the future!

OMSC5.jpg

The only possible hiccup I came across in sewing up the pattern was with the collar and collar stand. It took me several tries to get the curved edge of the collar stand to land just beyond the center front edge of the shirt, and I had to shave off a good amount of the pattern piece on either end to do so. Not a real issue though as this is really is a step that just takes extra work. The angle of the collar on all three of my boys shirts (angled more down than in) makes putting a button and buttonhole in the collar stand not make a lot of sense, as the collar on either side would be overlapping if buttoned up. This could be user error in making the pattern up (perhaps I shaved off too much of the ends of the collar stand), but I did run into this same issue with all three shirts. It is important to note however, this is only an issue if you plan on using the top button. If that if this is the case, the collar angle can be easily adjusted and the problem easily solved. I didn’t find this to be an issue at all as I didn’t find buttoning to the very top necessary, just something to note. Also, perhaps on the collar wouldn’t overlap if worn and buttoned to the top- as I only laid it flat to try and line everything up.

OMSC15.jpg
OMSC14.jpg

The shirts were surprisingly fast sews (especially with my track record of how long it takes me to make a decent men’s button-up). The instructions were easy to follow, and the end result looks so professional! My husband even came into my studio, and after looking over the boys shirts said he wanted one for himself! Winning!! This will officially be my go-to pattern for a classic boys Oxford Button-up!

OMSC6.jpg

I love this pattern so so much, I made ties to match the three button-up shirts using the pattern Everyday Neckties by Made with Dana.

OMSC1.jpg

I think my boys look rather handsome in their matching bug shirts and color-blocked ties. I am so over-the-top happy with the final result that I asked Peek-a-boo Patterns if they were willing to sponsor a giveaway of one of their patterns, so you can make your very own Classic Oxford Button-up as well!

Make sure not to miss a chance to win, and get all the details over on my instagram account found here.

IMG_1040.jpg

I caught on film my boys doing a group hug (be still my momma heart), which quickly turn into “if we all stand like this, we look like a huge pile of bugs!” The life of a boy mom…

IMG_1038.jpg

Every Christmas and Easter holiday I like my boys to have matching button-up shirts and my daughter to have a dress that goes along with what they are wearing. Thanks Peek-a-boo patterns for making my matching dreams so easy, endless and fun!

IMG_0986.jpg

Current 8 Most Worn Me Mades

Are there hand made items in your closet that you just reach for over and over again?

What are your requirements for go-to clothing items?

My day to day wardrobe is easy, low fuss, makes me feel cute, and moves with me through out my day. Here are my top eight most worn patterns that are currently making that cut (in no particular order).

*Also important to note, this list will change as the temperatures in Southern Califorina continue to drop. It is still pretty warm here so I am not yet pulling out all of my amazing cold weather me made clothing. I’m feeling another top eight coming on when that finally happens!

1). Emmerson Crop Pants by True Bias:

OOTD6-1-1.jpg

The truth is, I live in my Emerson Crop pants! I have two pair currently, both made out of linen blends from JoAnn’s. I have this navy pair, and another in mustard that I am shocked I haven’t taken a real picture of yet, considering I’ve been living in and loving them for over a year.

OOTD6-1.jpg

If you are like me, which my guess is if you are reading this post you are, I spend a lot of time on the floor. Cutting patterns, laying out fabrics, gazing into my kids eyes… life for me happens largely on the floor. The flat front, elastic back of these pants not only gives them a sophisticated look, but lots of wearing ease! These are a total change of the season must in my book!

2). Toaster Sweater by Sew House Seven:

toastersweater-1.jpg

Anyone else always cold in the mornings? Right now, where I live, it is in the 50’s or 60’s in the morning and 75-85 range mid afternoon. I don’t need a sweatshirt for long, but getting out of bed into the cold morning to help my kids get ready for the day require some amount of bravery! Ha! I love the Toaster Sweater because with the high neck I get warm fast!

toaster3-1.jpg
sewfancypants5-1.jpg

3). Frisco Jumpsuit by Threadbare Garments

I seriously get compliments every. single. time. I wear this! So much so that I have just flat out stopped telling people I made it myself, because the next question is usually, “Can you make me one?” Ha! In a perfect world I would sew for everybody. I love it so much, and I find great joy in seeing others happy. I am a mom of four little kids though, with little to no free time depending on the day of the week. Sewing for my own people can be such a challenge that I currently seldom take on extra jobs. It is all about money vs. time for me right now.

But I see why everybody wants one of these Frisco Jumpsuits. It is just that good.

IMG_7702.jpg

This cranberry linen from Blackbird Fabrics I think is what gives this Frisco Jumpsuit such a high end look and takes it over the top. I just love it!

IMG_7776.jpg

4). Panama Tee/South Port Dress mash up by Alina Sewing and Design Co/True Bias (respectively):

I feel like the South Port Dress needs no introduction. It is casual and fancy at the same time. It is easy to wear throughout the day as I run errands and chauffeur kids around, and lets me snuggle on the couch and watch a movie with my favorite at night. This is defenatly a closet staple I grab when I want to look cute.

LDM14.jpg
IMG_9133.jpg

Again, this is another linen piece (do I have a favorite fabric choice/blend?) made with this amazing linen/cotton blend from Minerva. It feels very high end to wear.

5). Burnside Bibs by Sew House Seven:

I love the impact of quickly throwing on these bibs over a simple t-shirt. It looks instantly intentional and thought out, and yet is simple and no fuss.

IMG_9548.jpg

I’ve said it before, and I will say it again, everyone looks good in this pattern. All body shapes and sizes are flattered by the long ties and gathered waistband.

IMG_9544.jpg

Wearing the Burnside bibs is an easy way to make a big statement. The Essex linen from Cotton and Flax is only an added bonus to an already great pattern.


6). Stellan Tee by French Navy Now:

IMG_0717.jpg

I love t-shirts and jeans. I think in my heart of hearts, I am a t-shirts and jeans kind of girl (although variety is the spice of life… and I tend to live spicy! Ha!). I love the Stellan Tee for it’s relaxed fit, that it is a quick sew, and for the attention to detail this pattern provides. It is easy to customize to your liking, and is another pattern that I’m sure looks good on everyone.

IMG_0217.jpg
IMG_6905.jpg


7). Cheyenne Tunic by Hey June Handmade:
Who would I be if I didn’t include the Cheyenne Tunic in this list. The instructions are so good, and the end product feel so professional.

IMG_6861.jpg

This is not only a great layering pieces, but a garment that is easily customizable (easy to make into short sleeves as well). There are no darts, leaving the fit more relaxed, boxy and easy to wear. As I don’t have a lot to show off about my upper body, boxy is my favorite.

IMG_7340.jpg

8). Green Point Cardigan by Hey June Handmade (hacked to look like the Blackwood Cardigan by Helen’s Closet:

I would be remiss if I didn’t include this unlikely candidate. This pattern is a children’s pattern from Hey June Handmade. It goes up to size sixteen, which is like a small in adult sizes. I probably wear this pattern the very most as I’m always looking for a light sweater to grab and thrown on over the top of any outfit either as it is cooling off in the evening or inside well air conditioned buildings.

familychristmas2018-1-1.jpg
IMG_6426.jpg

Did I make two different gray versions of this same sweater? I did. The versatility of a gray cardigan can not be understated. Ha! I seriously reach for these easy additions to an outfit that much that I excitedly have my next fabric for another already picked out!

gfdgiveaway2-1.jpg
2OOTD9-1.jpg

____________________

That completes my current most grabbed articles of clothing from my closet, for now! Ha! Again, I expect it to change as I wear more pants, jackets, and long sleeve tops.

What are your current most worn articles of me made clothing?

DIY Shared Boys' Bedroom

Yay! I am so happy to be able to finally share with you our DIY boy’s bedroom update! We started this update in June and finished this month, in September. We spent hours upon hours dreaming up, organizing and de-junking, building/sanding, and moving forward in our decisions with how to best make this space functional, intentional, and a place my kids want to be!

IMG_0232.jpg

This is my son and his buddy, loving our boys’ new digs. We have three boys. Over a year ago we moved one of them into his own room, but most nights he ended up on the floor of this room (or roaming the house as he struggled to stay in his bed, alone in his room). Another son spent his nights sleeping on a mattress on the floor in here as his bed had broken some time ago.

Do you find yourself getting comfortable in routines that don’t work or cause greater stress? I recently realized our sleeping situation 1) wasn’t working and 2) had been going on for far too long. This set me on a quest to fix all things about my sons’ living situation that wasn’t working. I had to be honest, and be willing to make big changes all with the goal to make their day to day lives better.

IMG_0279.jpg

My husband built this toddler bed in the boys’ room over seven years ago. All four of our kids have used it. It is as sturdy as they come. He used poplar wood to build the bed, but to save on costs, and knowing how hard our kids can be on the furniture we used pine for he remainder of the builds. We decided on bunk beds for our older two boys to maximize open floor space. We started the room update by building the bunkbeds, following Jay’s Custom Creations plans for twin bunk beds. My husband bought all his building supplies from Lowes. After he built the frame, but before we put it together, I used 80, 150, and finished with 220 grit sandpaper to smooth the wood. We used Minwax stain in both Ebony and Natural. We finished the bed with two coats of Minwax Paste Finishing Wax in Natural. Both my husband and I can lay on the top bunk without any worries of the bed falling apart. As the pricetag of a bed this sturdy is usually very high, I was happily willing to put in the seemingly endless hours of sanding required to make a bed I know will last.

IMG_0235-2.jpg

After we finished the boys beds, I moved on to the next item on the top of the list of things that needed attention in this space - clothing storage. My oldest son was still storing his clothes in his old room, and my younger boys were using a baby changing table to organize theirs. I knew I wanted a big dresser, something that would visually go with the rest of the furniture in this room, something affordable, and a piece that would make three boys getting ready in the morning a breeze. I found the Trava 6-drawer chest in Pine from Ikea USA, and used the same method as the bunk beds to finish the piece. I had my husband cut the legs at an angle for a more high end look, and bought these drawer pulls from Amazon to replace the ones that came with the dresser.

IMG_0282.jpg

Each boy has two drawers. The drawers are divided by a plastic bin the middle of the drawer either holding socks or undies. On either side of the bin are shorts/pants or shortsleeved shirts/long sleeve shirts. Pajamas, swimsuits, shoes and ties are all stored in the closet area.

IMG_0328.jpg

Once their dresser was in, I moved on to hat organization. The boys had a rack for their hats, but 99% of the time they would end up on the floor. I bought these hooks from amazon and orgaznied their hats above my youngest bed for easy access. I had this 36” x 36” canvas, purchased from JoAnns during a super sale, and pulled it out to make custom art for above their dresser. I researched online and sketched out a few ideas before settling on the basic shapes of this painting. While I didn’t plan out every aspect of how the painting would go, I’m really happy that I put some forethought into it, and really happy with the results. My husband built me this custom frame, and I sanded, stained and waxed using the above mentioned.

IMG_0305.jpg

Unfortunately, my boys closet doesn’t have any doors. As such visual organization of their closet is a bigger deal than other closets in our house. Redoing this room on a budget, I was less concerned about buying new, all matching storage bins than everything having a permeant place. The kids and I spent hours pulling out all books, toys, electronics, arts and crafts. Their closet holds all the toys they own. We sorted, threw away, dejunked and either found a home for it or got rid of it. I still plan to label all the bins to make cleaning even easier. One additional thing I did do was put an empty green bin on the right side of their closet. This bin is for when we are cleaning fast, or friends are over and helping us to clean up the kids room after playing. Anything can quickly be thrown in this bin for a quick cleanup, and sorted later during the day or week when we have time.

IMG_0271.jpg

There were a few last things I did for this space to make it functional, intentional and easy for the boys to live in. First, I took a free poster we grab in a visitors center driving back through Utah of Lake Powell. We visited Lake Powell during a family reunion two years ago and the boys can’t stop talking about it. I cut the poster in two, framed the two halves and hung them together on the wall.

IMG_0301.jpg

It is important to us that our children be good readers. Some love reading while others find it a chore, lose their books or their place in the books - making it impossible to read one from start to finish. To make it easier and more fun for them, my husband used scrap wood from previous projects and built three of these small, forward facing bookshelves. I then sanded, stained and waxed in the usual way. We put lights from Ikea next to each bed, making nighttime reading easy and special.

IMG_0283.jpg
IMG_0287.jpg

I put a rack behind the reading chair (which I will recover in a more neutral tone at a future date) to hold sports backpacks. I also hope to sew some different covers for their throw pillows. I put command hooks on the back of their bedroom door for robes. Bins go under their bed for school books and nighttime diapers.

I am truly happy with how this room has turned out. The boys have a much easier time keeping it clean, getting dressed, going to bed and finding what they are looking for. It is a space I enjoy being in to read them books, ask about their day, or all lay down on the floor together at night to listen to podcasts or music.

I am so happy we took the time to make this a truly enjoyable, well thought out, easy to live in space. And if routines or methods of doing things just aren’t working in the future, I know again I can make a change… quickly. No sense living in a space that isn’t functional. Now to move on to the next room in the house!

IMG_0248.jpg

Jutland Pants 2nd Edition

Have you ever made the Jutland Pants by Thread Theory Designs?

IMG_9943.jpg

I love this pattern. The directions are pretty straight forward and the end result is a polished pair of pants. This is my second try with this pattern (my first being this 12oz canvas pant pictured immediatly below - you can read more about them here), and I feel like every time I make them, I get a little closer to the perfect fit.

IMG_6829.jpg
IMG_9972.jpg

My husband has a very athletic build (big bottom, skinny waist, broad shoulder and upper body). After my first pair of Jutland pants, I quickly realized that he would need a curved waistband for all future pants. I went to YouTube and found this video to draft my own curved waistband. While I was nervous about the waistband, after following this tutorial it went off without a hitch and fits him perfectly. I would recommend making a note of the waist and hip measurements, and see if you too would benefit from a curved waistband.

IMG_9962.jpg

I also really enjoy being able to add fun pocket details. My husband works as an Emergency Medicine doctor, so it was fun to add these simple pocket EKG topstitching details.

IMG_9973.jpg

Jutland pants, as it says on the directions, are constructed to be tighter than ready to wear pants. I wanted my husband to be extra comfortable, so I sewed the pants up on the outer side seams and crotch with a smaller seam allowance, to add some extra room. The 5/8” seam allowance allows for sizing adjustments or preferences where needed/wanted.

IMG_9967.jpg
IMG_9948.jpg

The one thing that I feel like I haven’t figured out yet is the zipper fly. While I have followed the instructions both times, there are things that I need to do differently for the future. The fly not only feels flimsy, but the left front zipper shield/facing doesn’t stay in place to keep the zipper covered when the pants are zipped up (meaning it pulls to make the zipper constantly visible even when the pants are zipped and buttoned). If you have had experience with this, or know of a solutions I would love to hear it. Once I nail the fly, this will be my go to shorts/pants pattern for my husband.

IMG_9976.jpg

All in all I am happy with this pair, and all that I have learned. So much of the joy of sewing for me is the joy of learning and improving, and I am happy to say in the world of slow fashion, I slowly continue to do both!

Swimmies

IMG_7474.jpg

Sewing is not always the most economical choice.  When I started sewing, I thought learning to make clothes would allow me to have the wardrobe I wanted at a price tag that was affordable.  I have since learned, sewing most often doesn’t equal a smaller price tag (though it can as you consciously shop for fabric), and involves a lot of work. The thing is, I love it.  I love to sew.  Even if it takes longer.  And even if it doesn’t always work out. 

IMG_7545.jpg

In a family of six, I have learned where sewing is economical and especially worth the effort (even if it is a garment that scares me or requires me to learn a lot of new skills and be brave).

IMG_7554.jpg

Making swimsuits, especially female swimsuits, is a place where sewing can save my family money. Swimsuits don’t require a lot of material, but they do require a certain amount of bravery.    


IMG_8189.jpg

I was so excited when Megan Nielson came out with the Cottesloe swimsuit for women.  I sewed myself my first suit using her top rate instructions. I have worn it and loved it.  When I discovered Megan Nielson patterns was also coming out with a kids version of the Cottesloe suit (Mini Cottesloe) I almost exploded with happiness!  I knew I wanted to make one!

IMG_7541.jpg


I took out my swimsuit material and let my daughter choose the colors she wanted.  I was delighted when she picked the same green I used in my suit from Michael Miller Fabrics! She also picked a light coral color for the front, which actually was repurposed for a pair of American Apparel athletic leggings (see, economical, ha!).  Color blocking was her idea… cue proud mom moment.  I happily obliged.  Her top half fit into a size 10 (both her dad and I have broad shoulders), while her bottom half fit into a size 8.  I graded between the two and sewed it up.  As expected, the instructions made sewing another suit feel totally doable and made me feel a little like superwoman.


IMG_7564-2.jpg

She wore the suit and loved it.  After some time passed, she confided in me that lengthwise the swimsuit felt tight.  I checked the tension of the straps at her shoulder and inner thighs and sure enough it was too tight.  I had improperly graded the length of the suit when making the bottoms smaller than the top (according to her measurements).  She loved the suit, and I knew I needed to make a change.  I would chop the suit in half and add some length.


IMG_7608.jpg
IMG_7614.jpg
IMG_7657.jpg


I did not know how much I would love the look of the suit after fixing my mistake.  I love it even more than the original suit I made her, which I really liked.  The 2 inch band around the middle is slimming, an interesting/appealing detail, and adds the length my long waisted lady needed.

IMG_7620.jpg
IMG_7644.jpg

 I am so happy Megan Nielson Patterns listened to the people (Ha!  She might have been planning this suit all along, either way, so happy it’s here!) and came out with the perfect companion to the Women’s Cottesloe Suit. Next swim season in Califorina,  I will make an even more mommy and me version, and I can’t wait (hopefully my almost 12 year old won’t mind!).  At this point, I’m looking for every way to strengthen the bond between my only, maturing, thoughtful, strong, hardworking, smart and fun daughter and myself.  She is such a joy to me, and it is fun to find ways to continue to bond together.

IMG_7612.jpg

Lady Flamingo

IMG_9742.jpg

I did not expect to be as excited about this Vintage 1940’s Simplicity Pattern #0260 as I am. I absolutely love it! And don’t get me wrong, I bought the pattern because I thought I would like it, but it had some surprises in store for me that kept me from making it for a long time.

IMG_9817.jpg

First of all, the original pattern had a invisible side zipper. I wanted such a feminine pattern to have an equally light weight, with good drape feminine fabric. This light pink and gold foil flamingo fabric from JoAnn’s Fabric Store I knew would be perfect. A modern print with a classic silhouette seemed like the right way to go. But it is not sturdy enough to hold a side zipper, nor did I want to fuss with a zipper to get in and out of my shirt.

IMG_9769.jpg
IMG_9794.jpg
IMG_9739.jpg

Additionally, the pattern was drafted with a lot of darts. Two on both the bottom right and left front bodice piece, and one across each shoulder in the back. I knew I didn’t want darts. Any darts. I prefer my tops to be looser fitting, especially living in hot and humid southern California. I like air flow. Ha! So I used the width from the front bodice piece shoulders to redraft the back bodice piece shoulders to match them (as I was loosing width by omitting the darts). I also took about 3/8” off from the back side seams.

IMG_9839.jpg
IMG_9731.jpg
IMG_9823.jpg

The original pattern had bow ties on the front (which I did and completely love) and on either sleeve. I left the ties off the sleeves knowing that at any one time I have a chid hanging on me, and I didn’t want to constantly be retying them.

IMG_9725-2.jpg

Another favorite feature, besides the front tie, is the puffed, gathered sleeves. They make movement simple and the bias binding at the bottom gives them a polished look.

The remainder of this top went according to plan. The back has a slit for ease of taking on and off.


IMG_9840.jpg
IMG_9798-2.jpg


I love this Vintage 1940’s Simplicity Pattern. I feel cute and put together, and all I did was throw on a shirt. One I can live in! This is a total wardrobe win!

IMG_9745.jpg
IMG_9768.jpg

P.S. My daughter (whose birthday is this week) took these photos for me. Isn’t she amazing? I uploaded them for editing, and noticed a trend. And I was laughing hard telling my husband how moody this session was! Ha! I saved the best for last.

IMG_9795.jpg

Dream Bibs

IMG_9530.jpg

From the moment the Burnside Bibs, by Sew House 7, debuted I knew I wanted to wear them.  Then my friend, Katie Kortman, in an early handmade hustle before #handmadehustle was a thing, danced her heart out wearing her bids and sealed the deal for me.  That and the hundreds of amazing versions I’ve spied on Instagram since.  What a truly sensational pattern.  


IMG_9548.jpg


IMG_9549.jpg
IMG_9539.jpg

These bibs have been cut out, ready to sew since last fall!  Last fall!  I remember sitting at one of my kid’s soccer practices, fabric and pattern in hand, looking for a place to set up and cut the thing out.  I laid out a large beach blanket I found in my car, took out my pins and scissors, and was that crazy lady who brings crazy projects to soccer practices.  With three kids in soccer in Southern California (they are serious about their soccer here, ha!) I was spending 8-12 hours, just sitting and watching my kids’ practices. I can’t even sit in front of the TV unless I’m folding!  At any one time I am trying to accomplish multiple things, so when it occurred to me that I could bring my sewing projects to cut out (my least favorite part) during my kids practices I got right after it.  And in full disclosure, I am sitting at my daughter’s soccer practice writing this now!


I don’t know if you have had a chance to look at the Robert Kaufman, Essex Linen (44% linen, 45% cotton blend) collection by Cotton and Flax.  It is pure gold.  As your friend, I’m asking you go take a look.  You can look up Cotton and Flax fabric or one of her two lines (Balboa Fabric or Arroyo Fabric) and feel so inspired.  The fabric is thick, the designs are basic yet modern, and breathe creativity into any project I use them for (and I have made several out of her fabrics). 

IMG_7394.jpg
Landers7-1.jpg
yarijumpsuit2-1.jpg
IMG-0915.JPG
IMG-6894.JPG
IMG-9713.JPG


And incase your wondering about my perfect earrings, they were gifted to me by my extremely talented friend, wielding her crochet hook, over at Living the Craft Life.

IMG_9529.jpg

I am so happy with the way these bibs turned out.  On almost all project I sew I make some sort of modification be it a fitting issue or perhaps a design preference.  I made zero modifications on the Burnside Bibs!  Zero!  This is such a rare occurrence for me!  That means, as I sometimes forget to write down my hacks or adjustments, I will perfectly be able to make these again!

IMG_9537.jpg
IMG_9544.jpg
IMG_9534.jpg


Thanks to Sew House 7 and Cotton + Flax for allowing the perfect marriage of pattern and fabric. I’m creating my dream wardrobe one piece at a time!  

IMG_9532.jpg